{from food network dot com}
Ingredients:
4 tablespoons unsalted butter
1 pound onions, sliced
2 pounds lean beef, shoulder or round, cut into 1/4-inch thick slices
2 teaspoons brown sugar
3 tablespoons flour
1 tablespoon Dijon mustard
2 cups dark beer
1 cup beef stock
Salt and pepper
1 bay leaf
2 teaspoons mixed dried herbs, crumbled (thyme, rosemary, sage)
Directions
To a casserole pan add butter. When butter is hot stir in onions and saute until caramelized. Pour browned onions into a sieve over a bowl and let drain. Pour the fat
from the onions back into the casserole and when the fat is hot add beef, and remove as slices become brown. Drain in the sieve with the onions.
In the same casserole, stir in the brown sugar and add the flour. When a roux has formed, stir in mustard and add beer slowly to deglaze the pan. Add beef stock and
season with salt and pepper. Pour liquid into a bowl.
Layer the casserole with the meat and onions, making 3 layers of meat, sandwiching 2 layers of onions. Add a bay leaf and a teaspoon of mixed herbs on each layer
of onions. Pour beef sauce back into the casserole.
Add more beer to cover the meat if necessary.
Bring casserole to a boil, cover and bake in a 300 degree oven for
3 hours. Skim off fat, season with salt and pepper and serve.


3.11.17
21.10.17
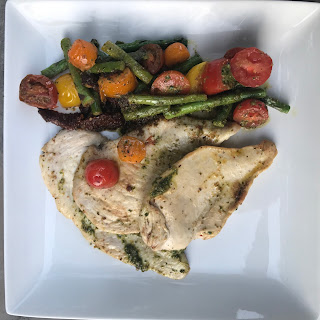
Chicken, Veggies & Pesto
Inspiration
Ingredients
Instructions
Ingredients
- 2 tablespoons olive oil
- 1 pound chicken thighs, boneless and skinless, sliced into strips
- salt
- 1/3 cup sun-dried tomatoes, drained of oil, chopped
- 1 pound asparagus, ends trimmed, cut in half
- 1/4 cup basil pesto or more, to taste (homemade pasta from Against the Grain)
- 1 cup cherry tomatoes, yellow and red, halved
Instructions
- Heat a large skillet on medium heat, add 2 tablespoons olive oil, add sliced chicken thighs, season chicken generously with salt, add half of chopped sun-dried tomatoes - and cook everything on medium heat for 5-10 minutes, flipping a couple of times, until the chicken is completely cooked through.
- Remove the chicken and sun-dried from the skillet, leaving the oil in.
- Add asparagus (ends trimmed), seasoned generously with salt, remaining half of sun-dried tomatoes, and cook on medium heat for 5-10 minutes until the asparagus is cooked through. Remove the asparagus to a serving plate.
- Add chicken back to the skillet, add pesto, stir to coat on low-medium heat until the chicken is reheated, 1 or 2 minutes. Remove from heat. Add tortellini, halved cherry tomatoes, mix with the pesto and the chicken. Add more pesto if desired. Taste, and add more salt if needed. Add chicken and tomatoes and to the serving plate with asparagus.

Turkey Burgers & Sweet Potato Fries
Burger:
- 1 pound ground turkey (I prefer 85% lean, it has more fat which makes for a better burger!) If your ground turkey has excess liquid, be sure to set on paper towels to remove the juices.
- 1/2-3/4 of one jalapeño pepper, minced(I like it hot so I use 3/4)
- 1 medium size shallot, peeled and minced
- zest and of one lime, and 2 teaspoon lime juice
- 2 Tablespoon chopped cilantro
- 1 teaspoon paprika
- 1 teaspoon cumin
- 1/2 a teaspoon sea salt
- 1/2 teaspoon black pepper
- guacamole
- poached egg (optional)
Instructions
- Note: The ground turkey I buy is the consistency of hamburger. If yours seems to have extra liquid, set on paper towels to drain juices.
- Place turkey, herbs, spices and lime in bowl and use hands to mix well.
- Form into four patties.
- Place pan on medium heat.
- Add olive oil to bottom of pan.
- When pan is hot, place patties in pan and cook for about 5 minutes each side or until cooked through.
- Top with guacamole
Guacamole:
1 Cut avocado, remove flesh: Cut the avocados in half. Remove seed. Score the inside of the avocado with a blunt knife and scoop out the flesh with a spoon. (See How to Cut and Peel an Avocado.) Place in a bowl.
2 Mash with a fork: Using a fork, roughly mash the avocado. (Don't overdo it! The guacamole should be a little chunky.)
3 Add salt, lime juice, and the rest: Sprinkle with salt and lime (or lemon) juice. The acid in the lime juice will provide some balance to the richness of the avocado and will help delay the avocados from turning brown.
Add the chopped onion, cilantro, and black pepper
Sweet Potato Fries:
3 - large sweet potato
Salt & pepper
Ranch seasoning by Flavor God
Light oil of Choice
Heat olive oil in a large skillet over medium heat and place sweet potato pieces into the hot oil. Cover skillet, pan-fry for 5 minutes; uncover and turn fries. Place cover back over fries and cook 5 more minutes; continue turning fries and covering until sweet potatoes are tender, about 10 more minutes.
Shrimp Guacamole Bites
Ingredients
2 cucumber about 8-10", some peel removed if you like and sliced into 1/2" rounds
2 cups of your favorite guacamole recipe
16-20 pieces of shrimp, peeled, deveined, & tails off
Old Bay & Blackened fish seasoning
2 tablespoons butter
2 whole cloves garlic, peeled
Freshly chopped cilantro for garnish
Instructions
Heat a skillet over mid-high heat while you prepare the cucumber slices.
Top each cucumber slice with about a teaspoon of guacamole and place on serving tray.
Season the shrimp with the seasoning. Place 2 tablespoons butter in the hot skillet and add the shrimp and 2 whole cloves garlic to the skillet. Allow to cook for about 45 seconds to a minute and turn each piece of shrimp over. Cook another 30 seconds, basting the shrimp with the skillet juices as they cook. When cooked through, remove the shrimp to a plate and place each one on top of the guacamole topped cucumbers. Garnish with chopped cilantro. Serve and enjoy!
Black Bean and Mango Salad
Ingredients
1/4 cup apple cider vinegar
2 tablespoons fresh lime juice
1 tablespoon honey
1 teaspoon ground cumin
1/3 cup canola oil
Kosher salt and freshly cracked black pepper
1/2 small ripe mango, peeled and diced into 1/4-inch pieces
1/2 yellow bell pepper, cut into small dice
1 (14.5-ounce) can black beans, drained and rinsed
1 small jalapeno, seeds and ribs removed, minced
1 small red onion, cut into small dice
1/4 cup fresh cilantro leaves, chopped
Directions
In a small mixing bowl, combine the vinegar, lime juice, honey and cumin. Slowly whisk in the oil until incorporated. Season with salt and pepper.
Mix the mango, pepper, beans, jalapeno and onion together in a large bowl. Drizzle the vinaigrette over the ingredients and toss to combine. Season the salad with salt and pepper. Garnish with the cilantro.
Pork Carnitas
Ingredients
5 lb / 2.5 kg pork shoulder (pork butt), skinless, bone-in (4lb/2kg without bone) (Note 3)
1 onion, chopped
2 1/2 tsp salt
1 tsp black pepper
4 cloves garlic, minced
2 oranges, juice only (or sub with 3/4 cup fresh orange juice)
Rub
1 tbsp dried oregano
2 tsp ground cumin
1 tbsp olive oil
Instructions
Rinse and dry the pork shoulder, rub in salt and pepper.
Combine the rub ingredients then rub all over the pork.
Place the pork in a slow cooker (fat cap up), top with the onion, minced garlic (don't worry about spreading it) and squeeze over the juice of the orange.
Cook on low for 8 to 10 hours or on high for 6 hours (or 1h 30 m in an electric pressure cooker on high. If using stovetop pressure cooker, please see notes).
The meat should be tender and falling off the bone. Remove from the slow cooker and let cool slightly. Then shred the pork using two forks.
Skim off the fat from the juices remaining in the slow cooker and discard the fat. Then if you are left with a lot more than 1 1/2 to 2 cups of juice, then reduce it (either in the slow cooker on the sauté setting with the lid off, or in a saucepan). The liquid will be SALTY, it is the seasoning for the pork. Set aside.
To Serve
Heat 1 tbsp of oil in a large non stick pan over high heat. Place shredded pork into the pan, drizzle over some juices. Wait until the juices evaporate and the bottom side is golden brown and crusty. Turn and just briefly sear the other side - you don't want to make it brown all over because then it's too crispy, need tender juicy bits.
Repeat in batches (takes me 4 batches) - don't crowd the pan.
Remove pork from skillet. Drizzle over more juices and serve immediately (if you are using defrosted carnitas, this is not applicable as the juices are already on the meat - see Note 4c).
If you are reheating the carnitas (Note 4), then flip and cook the other side briefly just to warm through. I really recommend only making one side crusty and leaving the other side juicy and moist.
Recipe Notes
1. If you are using a piece of pork that is not the size I use, you MUST reduce the salt accordingly. If your pork is more than 1 lb / 0.5 kg larger or smaller than the prescribed size, ensure you adjust the other ingredients accordingly as well, not just the salt.
2. To make this in the oven, add 1 cup of water to the braising liquid. Place in 325F/160C oven for 2 hours, covered, then roast for a further 1 to 1.5 hours uncovered. Add more water if the liquid dries out too much. You should end up with 1 1/2 to 2 cups of liquid when it finishes cooking.
If you make this recipe in the oven, you could skip the pan frying step because you will get a nice brown crust on your pork.
3. Use pork with the skin removed but leaving some of the fat cap on. The fat adds juiciness to the carnitas!
4. Taco Fixing suggestions: Diced avocado or make a real proper Guacamole, Pico de Gallo or Restaurant Style Salsa or even just sliced tomato, grated cheese, sour cream. Sliced lettuce or pickled cabbage / red onions would also be great, but unlike other tacos, you don't need it for the texture because the carnitas have the crispy bits!
29.9.17
Apple Cinnamon Protein Pancakes
NGREDIENTS
- 1 egg
- 1½ cups flour of choice (I used tapioca)
- 1 serving protein of choice (I used vanilla Optimum whey)
- 1 tablespoon baking powder
- 1 tablespoon ground cinnamon
- ½ teaspoon fine grain sea salt
- 1¾ cups coconut milk
- 1 tablespoon melted coconut oil, plus extra for greasing the pan
- ½ teaspoon pure vanilla extract
- 1 medium organic apple, chopped
INSTRUCTIONS
- In a medium mixing bowl, whisk together the flour, protein powder, baking powder, cinnamon, and salt.
- Pour in the coconut milk, coconut oil, and vanilla. Stir until just combined. Fold in the chopped apple.
- Heat a large non-stick frying pan over medium heat. Brush the pan with coconut oil, then pour the pancake batter onto the pan. Cook the pancakes for 2-3 minutes per side.
- Plate with your favorite toppings nuts/seeds, and enjoy!


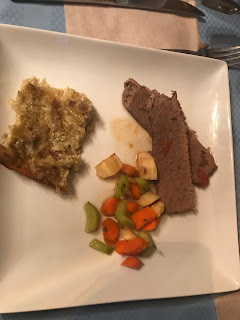
Rosh Hashanah Dinner
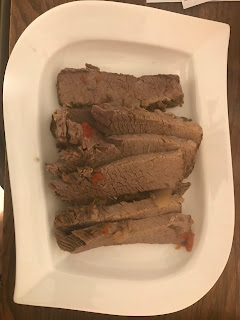
Holiday Beef Brisket with Onions
Ingredients
Kosher salt
Freshly ground pepper
2 teaspoons chopped thyme
1 teaspoon chopped oregano
1 tablespoon sweet
Hungarian paprika
One 6-pound flat-cut brisket
1/2 cup dried porcini mushrooms (1/2 ounce)
1 cup hot water
2 cups dry vermouth or white wine
1 cup chicken stock or canned low-sodium broth
2 cups chopped canned Italian tomatoes
3 bay leaves
4 medium onions, thinly sliced
3 tablespoons chopped garlic
How to Make It
Step 1
In a small bowl, combine 2 teaspoons of salt and 1 teaspoon of pepper with the thyme, oregano and paprika. Rub the seasonings all over the brisket.
Step 2
Place all ingredients into slow cooker and let sit for 8-12 hours on low, occasionally flipping every few hours
Potato Kugel with Fried Shallots
Ingredients
1 cup vegetable oil
4 large shallots, thinly sliced
5 pounds Idaho potatoes, peeled and coarsely shredded
1 large yellow onion, coarsely grated
1/3 cup potato starch
1 tablespoon kosher salt
1/2 teaspoon freshly ground black pepper
Pinch of freshly grated nutmeg
5 large eggs, beaten
2 large egg yolks, beaten
1/2 cup extra-virgin olive oil
1 cup boiling water
How to Make It
Step 1 Preheat the oven to 450°. In a medium saucepan, heat the vegetable oil until shimmering. Add
the shallots and cook over high heat, stirring occasionally, until golden and crisp, about 6 minutes. Using a
slotted spoon, transfer the shallots to a plate. Reserve the shallot oil.
Step 2 Working in batches, squeeze out as much of the liquid as possible from the potatoes and
transfer them to a large bowl as you go. Add the grated onion, potato starch, salt, black pepper and grated
nutmeg and stir well. Stir in the whole eggs, egg yolks, olive oil and boiling water, then stir in the fried
shallots.
Step 3 Heat two 8-by-11 1/2-inch flameproof or enameled cast-iron baking dishes over high heat until
they are very hot to the touch. Add 2 tablespoons of the shallot oil to each baking dish and heat until
smoking. Carefully spread the potato mixture in the sizzling baking dishes.
Step 4 Transfer the potato kugels to the oven and bake them for 20 minutes. Lower the temperature
to 375° and bake the kugels for 40 minutes longer, until golden and crisp on the sides.
Step 5 Preheat the broiler. Broil the potato kugels as close to the heat as possible for about 2
minutes, until they are browned and crisp on top. Let the potato kugels stand for 20 minutes before cutting
into squares and serving.
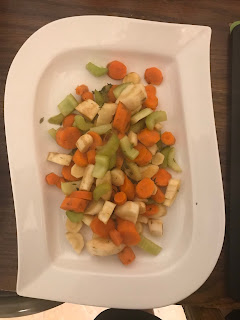
Honey-Glazed Roasted Root Vegetables
Ingredients
1 1/4 pounds parsnips, peeled and sliced 1/2 inch thick
1 1/4 pounds carrots, peeled and sliced 1/2 inch thick
One 1 1/4 pound celery root—peeled, quartered and sliced 1/2 inch thick
1/2 cup extra-virgin olive oil
1/2 cup honey
6 thyme sprigs
Salt and freshly ground pepper
2 tablespoons sherry vinegar
How to Make It
Step Preheat the oven to 425°. In a large bowl, toss the root vegetables with the oil, honey and thyme and season with salt and pepper. Divide between 2 large, sturdy rimmed baking sheets. Cover with foil and roast for 40 minutes, shifting the pans once, until the vegetables are tender. Remove the foil and roast for 10 minutes longer, until glazed. Return them to the bowl and stir in the vinegar then season with salt and pepper. Serve right away

Ingredients
Kosher salt
Freshly ground pepper
2 teaspoons chopped thyme
1 teaspoon chopped oregano
1 tablespoon sweet
Hungarian paprika
One 6-pound flat-cut brisket
1/2 cup dried porcini mushrooms (1/2 ounce)
1 cup hot water
2 cups dry vermouth or white wine
1 cup chicken stock or canned low-sodium broth
2 cups chopped canned Italian tomatoes
3 bay leaves
4 medium onions, thinly sliced
3 tablespoons chopped garlic
How to Make It
Step 1
In a small bowl, combine 2 teaspoons of salt and 1 teaspoon of pepper with the thyme, oregano and paprika. Rub the seasonings all over the brisket.
Step 2
Place all ingredients into slow cooker and let sit for 8-12 hours on low, occasionally flipping every few hours
Potato Kugel with Fried Shallots
Ingredients
1 cup vegetable oil
4 large shallots, thinly sliced
5 pounds Idaho potatoes, peeled and coarsely shredded
1 large yellow onion, coarsely grated
1/3 cup potato starch
1 tablespoon kosher salt
1/2 teaspoon freshly ground black pepper
Pinch of freshly grated nutmeg
5 large eggs, beaten
2 large egg yolks, beaten
1/2 cup extra-virgin olive oil
1 cup boiling water
How to Make It
Step 1 Preheat the oven to 450°. In a medium saucepan, heat the vegetable oil until shimmering. Add
the shallots and cook over high heat, stirring occasionally, until golden and crisp, about 6 minutes. Using a
slotted spoon, transfer the shallots to a plate. Reserve the shallot oil.
Step 2 Working in batches, squeeze out as much of the liquid as possible from the potatoes and
transfer them to a large bowl as you go. Add the grated onion, potato starch, salt, black pepper and grated
nutmeg and stir well. Stir in the whole eggs, egg yolks, olive oil and boiling water, then stir in the fried
shallots.
Step 3 Heat two 8-by-11 1/2-inch flameproof or enameled cast-iron baking dishes over high heat until
they are very hot to the touch. Add 2 tablespoons of the shallot oil to each baking dish and heat until
smoking. Carefully spread the potato mixture in the sizzling baking dishes.
Step 4 Transfer the potato kugels to the oven and bake them for 20 minutes. Lower the temperature
to 375° and bake the kugels for 40 minutes longer, until golden and crisp on the sides.
Step 5 Preheat the broiler. Broil the potato kugels as close to the heat as possible for about 2
minutes, until they are browned and crisp on top. Let the potato kugels stand for 20 minutes before cutting
into squares and serving.
Honey-Glazed Roasted Root Vegetables
Ingredients
1 1/4 pounds parsnips, peeled and sliced 1/2 inch thick
1 1/4 pounds carrots, peeled and sliced 1/2 inch thick
One 1 1/4 pound celery root—peeled, quartered and sliced 1/2 inch thick
1/2 cup extra-virgin olive oil
1/2 cup honey
6 thyme sprigs
Salt and freshly ground pepper
2 tablespoons sherry vinegar
How to Make It
Step Preheat the oven to 425°. In a large bowl, toss the root vegetables with the oil, honey and thyme and season with salt and pepper. Divide between 2 large, sturdy rimmed baking sheets. Cover with foil and roast for 40 minutes, shifting the pans once, until the vegetables are tender. Remove the foil and roast for 10 minutes longer, until glazed. Return them to the bowl and stir in the vinegar then season with salt and pepper. Serve right away


27.9.17
Chicken Enchilada Rice Casserole
Ingredients
2 cups dry Basmati rice Coupons
1 cup white cheddar shredded
1 cup Monterey Jack cheese shredded
3 cooked chicken breasts shredded
20 oz Enchilada sauce I used Old El Paso
16 oz refried beans I used Old El Paso
11 oz corn kernel drained
cilantro for garnish
salt and ground black pepper to taste
Instructions
Cook the rice. I cooked it with 4 cups of water and 1/4 cup of butter.
Preheat oven to 350 F degrees.
Mix the 2 cheeses together.
In a large bowl mix the shredded chicken with the enchilada sauce, refried beans and half of the cheese. Add rice, season with salt and pepper if needed, and mix well. Pour rice mixture into a large casserole dish. Top with corn then with remainder of cheese.
Bake for about 20 to 30 minutes or until cheese melts and is bubbly.
Garnish with chopped cilantro and serve warm.
31.8.17
Bacon Garlic Burger
Hamburgers
1 pound PRE Brands grass fed lean ground beef
1 cup fresh basil chopped
2 eggs
1 teaspoon sea salt
1/2 teaspoon fresh cracked pepper
3 cloves garlic minced
olive oil for cooking- see instructions
Toppings
1 batch 5 minute paleo hamburger buns make recipe
16 pieces cooked bacon
1 large avocado cut into wedges
4 slices red onion
1/2 cup creamy whole30 ranch make recipe
Instructions
Combine all the ingredients for the hamburgers and knead until well combined.
Heat a grill pan on the stove over medium heat.
Divide the meat into four patties. Drizzle each meat patty with olive oil. Then grill for four minutes on each side (or to personal taste).
Assemble burgers with buns, cooked bacon, ranch dressing, avocado wedges, and red onion slices.
Serve with extra crispy garlic lime sweet potato fries and some more ranch dip!
Whole30 Ranch
1 cup paleo mayonnaise homemade for whole30
1/2 cup fresh parsley
1/4 cup lemon juice
3-4 large cloves garlic
2 tablespoons fresh dill
1 teaspoon lemon zest
1/2 teaspoon sea salt
fresh cracked pepper to taste
23.8.17
Gluten Free & Allergen Friendly Expo + GIVEAWAY
This fall, catch more than just the leaves falling. October 14-15 in the NY Metro Area there will be the chance to catch up with fastest growing food expo in the US - the Gluten Free & Allergen Friendly Expo!
Do you have an allergy that makes it difficult to find good food brands? Are you recently diagnosed with a gluten-allergy? Are you a food enthusiast who enjoys the challenge of cooking outside the norm? Or are you someone who's made the lifestyle to live gluten-free?
Then THIS is the expo for you.

As a person who has chosen to go gluten and mostly-dairy free - I always enjoy the opportunity to find a new brand that I know I can count on while sticking restrictively to my diet. I jumped at the opportunity to attend this expo to expand my horizons and help out all of my followers.
So why should you go?
First of all, samples. Secondly, for those of you who are struggling and trying to figure out how to live and eat in different ways for allergy or lifestyle reasons - this is the perfect place to start. There will be samples, coupons AND classes.
CLASSES...for example "3 Steps to a gluten-free living" or "Tips, Tricks and Techniques with the Gluten Free Chef." As someone who has gone gluten free and ventured out on my own - it can be tricky, reading labels and finding substitutes for food. These classes can be invaluable for someone who is just starting out on their journey.
The Gluten Free & Allergen Friendly Expo is dedicated to meeting the needs of the celiac community, those with gluten and food sensitivities, auto-immune/inflammatory diseases, and autism. The public is helped through vendor expositions, educational sessions, and online resources. The manufacturers are serviced through vendor expositions, marketing programs, and consultative services.

And even if you don’t win, don’t fret –
right now through September 13th there’s a 30% off sale going on. Use the code EARLYBIRD
When:
October 14 10:00-4:00pm
& 15 10:00-3:00pm
[2017]
Where:
Meadowlands Exposition Center
355 Plaza Drive
Secaucus, NJ 07094
What the ticket gets you:
- Access to over 100 brands
- Samples from vendors
- Valuable coupons
- Informative Classes
- Free bag to carry your goodies.
So have I sold you? Check out tickets HERE and see you in Seacaucus in October!
For more general information on the GF&AF Expo, please check out their social media accounts:
https://www.facebook.com/gfafexpo
https://twitter.com/gfafexpo
https://instagram.com/gfafexpo/
Disclaimer: I have been given complimentary tickets and all opinions on my blog and live on my Instagram stream are mine. Please consult a healthcare provider if you believe you have a food allergy or would like to make a lifestyle change.
Do you have an allergy that makes it difficult to find good food brands? Are you recently diagnosed with a gluten-allergy? Are you a food enthusiast who enjoys the challenge of cooking outside the norm? Or are you someone who's made the lifestyle to live gluten-free?
Then THIS is the expo for you.
As a person who has chosen to go gluten and mostly-dairy free - I always enjoy the opportunity to find a new brand that I know I can count on while sticking restrictively to my diet. I jumped at the opportunity to attend this expo to expand my horizons and help out all of my followers.
So why should you go?
First of all, samples. Secondly, for those of you who are struggling and trying to figure out how to live and eat in different ways for allergy or lifestyle reasons - this is the perfect place to start. There will be samples, coupons AND classes.
CLASSES...for example "3 Steps to a gluten-free living" or "Tips, Tricks and Techniques with the Gluten Free Chef." As someone who has gone gluten free and ventured out on my own - it can be tricky, reading labels and finding substitutes for food. These classes can be invaluable for someone who is just starting out on their journey.
The Gluten Free & Allergen Friendly Expo is dedicated to meeting the needs of the celiac community, those with gluten and food sensitivities, auto-immune/inflammatory diseases, and autism. The public is helped through vendor expositions, educational sessions, and online resources. The manufacturers are serviced through vendor expositions, marketing programs, and consultative services.
And here is the best part!
I am giving away THREE free one-day tickets to this event!!
Please check out my Instagram page for full details on how to win a one-day pass
And even if you don’t win, don’t fret –
right now through September 13th there’s a 30% off sale going on. Use the code EARLYBIRD
When:
October 14 10:00-4:00pm
& 15 10:00-3:00pm
[2017]
Where:
Meadowlands Exposition Center
355 Plaza Drive
Secaucus, NJ 07094
What the ticket gets you:
- Access to over 100 brands
- Samples from vendors
- Valuable coupons
- Informative Classes
- Free bag to carry your goodies.
So have I sold you? Check out tickets HERE and see you in Seacaucus in October!
For more general information on the GF&AF Expo, please check out their social media accounts:
https://www.facebook.com/gfafexpo
https://twitter.com/gfafexpo
https://instagram.com/gfafexpo/
Disclaimer: I have been given complimentary tickets and all opinions on my blog and live on my Instagram stream are mine. Please consult a healthcare provider if you believe you have a food allergy or would like to make a lifestyle change.
10.8.17
Coconut Tenders with Strawberry-Mango Salsa
Ingredients
Tenders
Vegetable cooking spray
3 boneless, skinless chicken breasts
Kosher salt
Freshly ground black pepper
½ c. cornstarch
1½ tsp. garlic powder
2 large eggs
1 c. sweetened flaked coconut
1 c. panko bread crumbs (for grain free: try chick pea bread crumbs found at Whole Foods)
1 tsp. paprika
Lime wedges
Salsa
¾ c. Finely chopped strawberries
¾ c. finely chopped mango
½ c. finely chopped shallot
2 tbsp. Chopped fresh cilantro
1 tbsp. fresh lime juice
salt
pepper
Directions
Preheat oven to 425 degrees F. Set an oven-proof wire rack on a rimmed baking sheet and spray with cooking spray.
Cut chicken into 1/2- to 3/4-inch-thick strips. Season with salt and pepper. Stir together cornstarch and garlic in a shallow dish. Place egg in a second shallow dish. Stir together coconut, breadcrumbs, paprika, and 1/2 teaspoon each salt and pepper in a third shallow dish.
Working one piece at a time, dip chicken in cornstarch mixture, then in the egg mixture, then in coconut mixture, pressing gently to help adhere. Transfer to the greased rack. Spray chicken with cooking spray until well coated.
Bake until golden brown and cooked through, 10 to 20 minutes.
For the salsa, combine all ingredients in a bowl. Let stand 10 minutes before serving.
Serve the chicken with the salsa and lime wedges.
Don't want to turn the oven on?
Using a light oil like avocado and pan fry for 3-5 minutes on each side. It's still summer here and there ain't no way I'm turning on the oven :)
31.7.17
Crock Pot - Pot Roast & Mashed Potatoes
Ingredients:
(1) 3-5 lb. chuck roast
2 tbsp. olive oil (or vegetable oil)
salt & pepper, to taste
1 packet ranch dressing mix
1 packet dry onion soup mix
1 stick butter (1/2 cup) – REAL salted butter, not margarine
Instructions
Heat up a large skillet on high.
Add oil to hot skillet.
You want it really hot here to brown or "sear" the beef quickly.
Take a paper towel and make sure you dry both sides of the pot roast.
Season with a little bit of salt and pepper.
Once the skillet is nice and hot, add the roast.
Allow the roast to cook for about 2-3 minutes until it is golden brown.
Using tongs, flip the meat over and sear the other side of the roast for another 2-3 minutes.
Transfer meat to slow cooker.
Sprinkle packets of dry ranch dressing and onion soup mixes over pot roast.
Top with a stick of butter then place peppers on and around roast.
Cover and cook on low for 8 hours.
Take two forks and start shredding the meat.
Discard any big fatty pieces.
Mashed Potatoes:
6 small-medium red bliss potatoes peeled & chopped
Butter
Garlic
Flavor God Himalayan Pink Salt
Heavy Cream
- Boil potatoes for 15 minutes and then mash
- Add in butter and let it melt completely
- Add in garlic, salt and cream for appropriate flavor
18.7.17
Mango Shrimp Stuffed Avocados
Ingredients
2 avocados halved and pitted
8 oz bay shrimp (1 cup)
1 mango pitted and diced
1/2 cup red onion diced
1/2 cup red bell pepper diced
1/2 jalapeño seeded and diced
1/4 cup cilantro leaves chopped
1 lime (juice, 2-3 tbsp)
salt and pepper to taste
Instructions
Scoop out half of the avocado leaving a "bowl" area in each. Place the scooped avocado into a medium-size mixing bowl and mash with a fork. Season with salt and pepper.
Add the mini bay shrimp, mango, red onion, bell pepper, jalapeño, lime juice and and cilantro to the mashed avocado. Stir to combine and mix thoroughly.
Scoop avocado shrimp mixture into each avocado bowl and serve immediately or cover and chill. Serves 2 people.

- Posted using BlogPress from my iPhone
17.7.17
Fresh Marinara Sauce & Pasta Chips
Marinara:
Ingredients
3 tablespoons olive oil
1/2 onion, chopped
8 large tomatoes, peeled and cut into big chunks
6 cloves garlic, minced
1 bay leaf
1/2 cup red wine
1 tablespoon honey
2 teaspoons dried basil
1 teaspoon oregano
1 teaspoon dried marjoram
1 teaspoon salt
1/2 teaspoon ground black pepper
1/4 teaspoon fennel seed
1/4 teaspoon crushed red pepper
2 teaspoons balsamic vinegar, or more to taste
Directions
Heat olive oil in a stockpot over medium heat. Cook and stir onion in hot oil until softened, about 5 minutes; add tomatoes, garlic, and bay leaf. Bring the liquid from the tomatoes to a boil, reduce to medium-low, and simmer mixture until tomatoes are softened, about 30 minutes.
Stir red wine, honey, basil, oregano, marjoram, salt, black pepper, fennel seed, and crushed red pepper into the tomato mixture; bring again to a simmer and cook until herbs have flavored the sauce, about 30 minutes more.
Stir balsamic vinegar into the sauce.
Pasta Chips:
1 lb. bowtie pasta
Vegetable oil, for frying
1 tsp. Italian seasoning
1 tsp. garlic powder
1/2 c. finely grated Parmesan
kosher salt
Freshly ground black pepper
marinara, for serving
In a large pot of salted boiling water, cook pasta until al dente, about 8 minutes.
Drain pasta.
In a large, deep skillet, pour about ½” vegetable oil and heat over medium.
When the oil is shimmering, add about 1 cup al dente pasta in a single cook.
Cook until golden brown and crispy, about 2 minutes per side.
Drain on paper towels, then season immediately with some Italian seasoning, garlic powder, Parmesan, salt and pepper.
Repeat, working in batches, with the rest of the pasta.

- Posted using BlogPress from my iPhone
Guacamole Deviled Eggs
INGREDIENTS
6 large hard-boiled eggs
1 medium avocado
1 tablespoon chopped red onion
1 tablespoon chopped cilantro
2 to 3 teaspoons lime juice
1/2 teaspoon granulated garlic
1/2 teaspoon cumin
1/4 teaspoon chili powder
1/4 teaspoon sea salt, add more to taste
1 roma tomato, finely diced
INSTRUCTIONS
Peel the eggs. Slice them in half, lengthwise. Scoop out the egg yolks into a small bowl. Mash the egg yolks with a fork.
Scoop the avocado flesh into the bowl with the egg yolks. Mash the avocado into the yolks. Mix in the onion, cilantro, lime juice, garlic, cumin, chili powder and salt. Taste the filling and adjust the seasoning to your taste. Add the diced tomatoes and mix until well incorporated.
Spoon or pipe the avocado mixture into the egg whites. Sprinkle additional pepper flakes or other spices on top of the eggs, if you like. Serve immediately.

- Posted using BlogPress from my iPhone
16.7.17
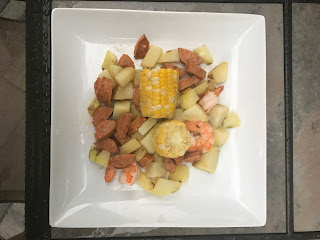
Shrimp & Sausage Foil Packets
INGREDIENTS
1 1/2 lb. large shrimp, peeled and deveined
2 cloves garlic, minced
2 smoked andouille sausages, thinly sliced
2 ears corn, each cut crosswise into 4 pieces
1 lb. red bliss potatoes, chopped into 1-in pieces
2 tbsp. extra-virgin olive oil
1 tbsp. Old Bay seasoning
1 lemon, sliced into thin wedges
4 tbsp. butter
kosher salt
Freshly ground black pepper
2 tbsp. chopped fresh parsley leaves
DIRECTIONS
Preheat grill over high heat.
Cut 4 sheets of foil about 12 inches long. Divide shrimp, garlic, sausage, corn, and potatoes evenly over the foil sheets. Drizzle with olive oil. Add the Old Bay seasoning and season to taste with salt and pepper. Toss gently to combine. Top each mixture with parsley, lemon and a tablespoon of butter each.
Fold the foil packets crosswise over the shrimp boil mixture to completely cover the food. Roll the top and bottom edges to seal them closed.
Place foil packets on the grill and cook until just cooked through, about 10-15 minutes.
Serve immediately.
- Posted using BlogPress from my iPhone
1 1/2 lb. large shrimp, peeled and deveined
2 cloves garlic, minced
2 smoked andouille sausages, thinly sliced
2 ears corn, each cut crosswise into 4 pieces
1 lb. red bliss potatoes, chopped into 1-in pieces
2 tbsp. extra-virgin olive oil
1 tbsp. Old Bay seasoning
1 lemon, sliced into thin wedges
4 tbsp. butter
kosher salt
Freshly ground black pepper
2 tbsp. chopped fresh parsley leaves
DIRECTIONS
Preheat grill over high heat.
Cut 4 sheets of foil about 12 inches long. Divide shrimp, garlic, sausage, corn, and potatoes evenly over the foil sheets. Drizzle with olive oil. Add the Old Bay seasoning and season to taste with salt and pepper. Toss gently to combine. Top each mixture with parsley, lemon and a tablespoon of butter each.
Fold the foil packets crosswise over the shrimp boil mixture to completely cover the food. Roll the top and bottom edges to seal them closed.
Place foil packets on the grill and cook until just cooked through, about 10-15 minutes.
Serve immediately.

- Posted using BlogPress from my iPhone
10.7.17
hawaiian bbq pork tacos
Ingredients
- Pulled Pork:
- 1 tablespoon olive oil
- 2 cups chicken broth
- 1/2 cup worchester sauce
- 1 cup BBQ Sauce
- 2 lbs pork butt or shoulder
- 1 tablespoon Flavor God taco seasoning
- Pineapple Pico de Gallo:
- 2 cups diced pineapple
- 1 cup diced cherry tomatoes
- 1/4 cup diced red onion
- 1 lime, juiced
- 1/4 cup loosely diced cilantro
- 1/2 teaspoon salt
- 1/2 teaspoon pepper
- 1/4 teaspoon chile powder
- Tacos:
- 8 small flour or corn tortillas, warmed
- Pineapple Pico de Gallo: In a medium bowl, pineapple, cherry tomatoes, lime juice, cilantro, salt, pepper and chile powder. Taste and season, if needed.
3.7.17
Cowboy Caviar Chicken
Cowboy Caviar Chicken
prep 10 mins
cook 10 mins
total 20 mins
Ingredients
For the Cowboy Caviar:
1 (15 oz.) can black beans drained and lightly rinsed
1 (15.25 oz.) can corn, drained (can substitute with 1 ¾ cups of fresh corn off the cob)
1 cup halved grape tomatoes
1 green bell pepper, diced
½ cup finely chopped red onion
¼ cup fresh lime juice
¼ cup olive oil
½ tsp salt
½ tsp ground cumin
Dash of cayenne pepper
For garnish: fresh cilantro and/or diced avocado
For Serving:
1 lb. chicken, cooked (I like to use grilled chicken, but a store-bought rotisserie chicken or oven baked chicken breasts will also work)
2 teaspoons olive oil
Salt and pepper, to taste
Instructions
To Prepare Cowboy Caviar:
In a large bowl, toss together beans, corn, tomatoes, bell pepper, and onion. In a separate bowl, whisk together lime juice, olive oil, salt, cumin, and cayenne until completely combined. Pour dressing over the bean mixture and toss to coat. Cover and refrigerate until ready to serve.
For the Chicken:
I like to grill about 1 lb. of boneless, skinless chicken breasts for this recipe. To do so, preheat an outdoor grill or an indoor grill pan to medium high heat. Rub chicken with olive oil and season with salt and pepper on all sides. Place chicken on the grill and cook for about 5-6 minutes per side, or until cooked through.
Serve grilled chicken topped with Cowboy Caviar. Garnish with fresh cilantro and sliced avocado, if desired.
Nutrition Facts
Serving Size 4 ounces grilled chicken plus 1/2 cup Cowboy Caviar
Amount Per Serving
Calories 267.3
% Daily Value
Total Fat 9.8 g
15%
Saturated Fat 1.6 g
8%
Cholesterol 66 mg
22%
Sodium 251.1 mg
10%
Total Carbohydrates 15.6 g
5%
Dietary Fiber 3.6 g
14%
Sugars 1 g
Protein 29.8 g
60%
* Percent Daily Values are based on a 2,000 calorie diet. Your daily values may be higher or lower depending on your calorie needs.
Recipe by The Seasoned Mom at http://www.theseasonedmom.com/cowboy-caviar-chicken/
- Posted using BlogPress from my iPhone
16.6.17
Ground Turkey with Cabbage
Ingredients:
1 medium onion, chopped
1 tbsp olive oil
1 lbs extra lean ground turkey
2 lbs cabbage, coarsely chopped
1 cup homemade tomato sauce (or your favorite tomato sauce)
1/2 cup vegetable broth
Salt and pepper
1 cup frozen peas
½ cup mozzarella cheese, shredded
Fresh parsley for garnishing
Directions:
In a cast iron skillet add olive oil over medium heat.
Add onion and cook until are gold brown, stirring occasionally.
Add ground turkey and cook for 10 minutes or so, breaking it into small pieces and stirring occasionally.
Add cabbage and cook for about 5 minutes and don’t forget to stir well.
Add tomato sauce, broth, salt and pepper and stir well to combine all the ingredients together.
Cook for 7minutes.
Add peas and cook for more 2 minutes.
Top with mozzarella cheese and cover the skillet just to melt the cheese. It only take about 1 or 2 minutes.
Serve warm topped with fresh parley.

Maple Glazed Chicken
Ingredients
Chicken:
1 lb boneless skinless chicken breast cutlets
Salt and pepper to taste
1/2 cup white whole wheat flour
2 tablespoons olive oil
Sweet Potatoes:
1 tablespoon olive oil
2 medium sweet potatoes, peeled and diced into 1/2-in cubes
1 small onion, finely diced
2 cloves garlic, minced
1 teaspoon paprika
Salt and pepper to taste:
Maple Glaze:
1 tablespoon olive oil
1 clove garlic, minced
3 tablespoons balsamic vinegar
1/4 cup maple syrup
Salt and pepper to taste
Instructions
Pat chicken dry and season with salt and pepper on both sides. Dredge chicken breasts in flour. In a large skillet over medium-high heat, heat oil until shimmery. Place chicken in pan and brown on both sides, 3-4 minutes on each side until golden-brown. Transfer chicken to a plate and set aside for a moment.
Make the sweet potatoes: Heat 1 tablespoon oil in same skillet over medium-high heat until hot. Saute sweet potatoes, onion, and garlic in oil 5-8 minutes until veggies are golden and caramelized (sweet potatoes won't be cooked through) Stir in paprika and season with salt and pepper to taste.
Arrange chicken breasts around the sweet potatoes in skillet. Bake at 400F 20-25 minutes or until chicken registers 165F and sweet potatoes are tender.
While chicken bakes, make the sauce: In a small skillet over medium-high heat, heat olive oil then saute garlic in oil until just fragrant. Stir in vinegar, syrup, and season with salt and pepper to taste. Bring sauce to a boil, then reduce heat to medium and let simmer until reduced and thickened, about 10 minutes.
Once chicken is done, drizzle with maple sauce. Enjoy!
- Posted using BlogPress from my iPhone
26.4.17
Sheet Pan Shrimp Fest
SHEET PAN SHRIMP BOIL
YIELD: 6 SERVINGS
PREP TIME: 10 MINUTES COOK TIME: 30 MINUTES
TOTAL TIME: 40 MINUTES
Easiest shrimp boil ever! And it’s mess-free using a single sheet pan. That’s right. ONE PAN. No newspapers. No bags. No clean-up!
PRINT RECIPE
INGREDIENTS:
1 pound baby Dutch yellow potatoes
3 ears corn, each cut crosswise into 6 pieces
1/4 cup unsalted butter, melted
4 cloves garlic, minced
1 tablespoon Old Bay Seasoning
1 pound medium shrimp, peeled and deveined
1 (12.8-ounce) package smoked andouille sausage, thinly sliced
1 lemon, cut into wedges
2 tablespoons chopped fresh parsley leaves
DIRECTIONS:
Preheat oven to 400 degrees F. Lightly oil a baking sheet or coat with nonstick spray.
In a large pot of boiling salted water, cook potatoes until just tender and parboiled, about 10-13 minutes. Stir in corn during the last 5 minutes of cooking time; drain well.
In a small bowl, combine butter, garlic and Old Bay Seasoning.
Place potatoes, corn, shrimp and sausage in a single layer onto the prepared baking sheet. Stir in butter mixture and gently toss to combine.
Place into oven and bake for 12-15 minutes, or until the shrimp are opaque and corn is tender.
Serve immediately with lemon wedges, garnished with parsley, if desired.
- Posted using BlogPress from my iPhone
5.4.17
Our Disneyworld Trip
Our Family Trip to Disneyworld
In February
of 2016 my husband and I planned a dream trip to LA for a 5-day trip exploring
the city and neighboring cities. We were so excited – it was a trip we had been
planning for, for years. The itinerary was set, reservations made ,PTO
requested; however it quickly turned into a nightmare. My daughter contracted
the Norovirus who promptly gave it to me and then to my husband. Almost every
day of the trip – someone felt crappy. Our Airbnb was not what we expected and sprinted for a hotel and
we quickly learned to absolutely hate LA traffic. To top it off, the trip ended
with us being stuck on the runway at 10pm for an hour and then in the parking
lot the gate didn’t go up properly and we blew out three tires.
In the weeks
after, I swore our 2017 family trip would be much simpler than that. No getting
in and out of the car, no sitting in traffic just good food and a good trip. It
was then that I quickly decided – we were going to Disneyworld. In my normal
obsessive fashion I started researching and reading everything I possibly could
about a full trip to Disney. Early on, a number of things were easily decided:
we would go in February a few weeks prior to my daughter’s 3rd birthday so she
could get into the park for free, we would stay on the Disney grounds and we
investigate the meal plan.

With
planning this logistical of a trip, it is easy to quickly get overwhelmed as there are many
sites out there that have tons of advice, packing lists, park plans, etc… but
what is good is that you can comb through it and see what fits for your family.
I consulted some very good friends, family and then ultimately just called the
people at Disney reservations and spent an hour on the phone with them going
over all of my options. Now I know there are cheaper options out there – you
can go through AAA or 3rd party consultants but in my honest opinion
(or as the kids say IMHO) I prefer to deal directly with the source because if
something goes wrong, you can deal with Disney directly and not have to go
through a middle man.
Finally when
the reservations opened up last May I had all the information I needed to pull
the trigger:
- We would
stay at the Disney All-Star Movies (we later switched hotels, but I’ll get into
that late
- Arrive on
a Sunday afternoon, leave on a Saturday morning
- My husband
and I would get the Deluxe Meal Plan (my daughter was free entry to the park
and therefore did not get a meal plan)
- We got the
5-day park pass, we didn’t want to do a park hopper because she was so little
- We would
not rent a car and would instead rely on the bus system inside the campus
And after an
easily refundable $200 – it was all set.
But…that is
just the tip of the iceberg. Deciding to go to Disney and making the hotel and
flight reservations are seriously just the easiest part of the whole trip.
Booking dining reservations and fast passes requires a level of research I
definitely was not ready for.
First things
first, keep an eye out on Disney’s special offers on the web site. I made a
calendar event on my calendar for something on a bi-weekly basis simply because
25% off hotels and free meal plans are offers that occasionally pop up. It was through one of these offers that I was
able to switch our hotel from All-Star Movies to the Art of Animation hotel –
which had normally been about $900 more.
The first
thing we tackled was what day we would go to what park. We decided we wanted to
start/end the trip at Magic Kingdom and then chose the other 3 days using
calendar function on the site and seeing our options for magic hours.
- Monday:
Magic Kingdom
- Tuesday:
Epcot
- Wednesday:
Hollywood Studios
- Thursday:
Animal Kingdom
- Friday:
Magic Kingdom
The next and
biggest task ahead of us was deciding the dining reservations. I had heard from
a few friends it was an exhausting process and trust me when I say, they are
100% right. If you are staying on the Disney property you get to book your
reservations starting 6am EST 180 days prior to check-in. Believe me when I say
being prompt on and on-time is absolutely no joke if you want to go to places
like Be Our Guest and Cinderella’s Royal Table. Now depending on your party
size and budget you may chose not to do a dining plan or you may decide to do a
cheaper one. While I have been to Disney multiple times with family and work –
there have only been two instances where I could chose to do the dining plan.
The first time, about 5 years ago, we opted not to and felt stressed the entire
time when we ate about how much we were spending. This time we opted for the
most expensive one (the Deluxe dining plan) for a number of reasons: 1) it
comes with an appetizer, entree and dessert at every meal and since our
daughter would not have a meal plan, we could make it up by utilizing our
appetizers and entrees and 2) because it came with 2 meals a person per day and
well…my husband eats a lot of food.
The first
web site I used was MyDisneyObsession.com – this web site is a plethora of
information. My favorite part was that there was an itinerary section for
families with little kids. It was from this list that we created the way we
wanted to see each park and thus, the food list.
Like I said
previously, there is a lot of information out there about all plans – but I
would recommend getting the approved list from the Disney site so you can see
what restaurant is agreeable to which plan. We wanted to be able to sit down at
each meal, we wanted to see the characters and we wanted to be sure we could
get decent times. It took a lot of writing and re-writing to figure it out but
eventually we had it all done on that August day. We planned to do the earliest
breakfasts we could book, a lunch around 12-1p and then dinner around 5-6pm.
Now I will say that we made adjustments to our lunch plans after the first day.
Some kids can push through and some will nap in their stroller – my daughter was
neither of those so after day 1 at Magic Kingdom we had to make adjustments to
all the meals for lunch and dinner for the rest of the week so we could go back
to the hotel for 2-3 hours for a family nap (yes, parents need nap as well).
 |
| Cinderella's Royal Table @ Magic Kingdom |
All-in-all,
here is where we netted out for restaurants and some of my thoughts:
Sunday night:
Splitsville
Dining Room in Disney Springs. While the meal itself was good, we waited
over an hour for a round of burgers and some chicken which wasn’t exactly
great. I think if the food had gotten there quicker I might have thought
differently but by the time food showed up we housed it and then to the World
of Disney store to buy ears and then left
Monday
Breakfast: Chef Mickey. This place was hands down the best breakfast of the
entire trip. It is one of the more pricey character breakfasts so I was pleased
it lived up to the cost. We got to see all of the characters and trust me
starting your Disney trip off with Mickey Mouse is the absolute best way to do
so. The food was fantastic.
Lunch: Liberty
Tree Tavern. Located in the heart of Libery Square this lunch did not disappoint. It was definitely the Liberty America experience
you would want and the food was fantastic. You had the option of ordering a
regular entree or ordering off the never ending meal where you could get
turkey, mashed potatoes and excellent bread pudding
Dinner: cafeteria at the hotel
Tuesday
Breakfast:
Princess Storybrook Dining Breakfast at
Akerhus Royal Banquet Hall (Norway, World Showcase. Here’s the thing – if
we had only done this princess breakfast I would recommend it to all. You can
get in as early as 8am, it is RIGHT next door to Elsa and Anna autographs (we
only waited 20 minutes) and you’re in Epcot early…sometimes 30 minutes prior to
the park opens; however, we also did Cinderella’s on Friday where my daughter
also met all the princess but the food was 10x better (even though it cost us 2
tickets). The food wasn’t that great but it was still a nice experience. If we
went back, I would probably do Cinderella’s but not this.
Lunch: The
Garden Grill. I have eaten here a number of times and frankly always enjoy
it. You again, get to meet the usual characters of Mickey, Minnie but also Chip
and Dale. Plus the restaurant slow rotates within the Land.
Dinner: San
Angel Inn (Mexico, World Showcase). First let me start off by saying we did
not take my daughter to this dinner with us. We were lucky to have my parents
with us for a few days of the trip so we were able to have a date night. The
food was amazing (AH-MAZING) and they had an avocado margarita on the menu that
was probably one of the best drinks I have ever had.
 |
| Avocado Margarita's @ San Angel Inn, Mexico, World Showcase |
Wednesday
Breakfast: Hollywood & Vine. Disney Junior character breakfast – if your
kids like these characters it would be a good breakfast.
Lunch: 50s
Primetime Café. Definitely a fun and relaxing atmosphere – it was hot that
day so it was nice to sit down and eat a good meal.
Dinner: SciFi Dine-In Theater. I didn’t realize they would be playing old movies – I think it would
be interesting if they had switched it up and put some of the newer Disney
movies in there but at least the food and service was good.
Thursday
Breakfast:
Tusker House. Character breakfast
again – food was good and so was the atmosphere. Cool thing was it was right
next to the safari so we were able to go get in line prior to the 9am park open
Lunch: (I don't remember)
Dinner: pizza from the hotel cafeteria
Friday
Breakfast: Cinderella’s Royal Palace. An absolute dream of a breakfast - you
start off with a photo with Cinderella and then you get to upstairs inside the
super awesome Cinderella’s castle and enjoy a delicious breakfast. They give
the little girl’s wands and the boys swords and you once again meet all of the
princess’s. I would absolutely do this again.
Lunch:
Dinner: Be
Our Guest. This restaurant was the BEST way to end the trip. As a huge
Beauty and the Beast fan I was absolutely transported to the ballroom of the
Beast’s castle. There was no other way to describe than to just say that it was
simply magical. The food was great and you could order the “Grey Stuff” on the
menu. I also may have sang “Be Our Guest” the entire time as well.
 |
| The Grey Stuff, Be Our Guest @ Magic Kingdom |
Next up was fast passes. You
get to choose the Fast Passes about two months prior. For us, this fluctuated
up until the week before we left and even while we were there. We were able to
get on rides quicker once in the park so thanks to the Disney app, you can make
adjustments on the fly. It ultimately comes down to what you want to do but
here is what we did.
Magic
Kingdom:
- Buzz
Lightyear
- Meet Ariel at her Grotto
- Pooh’s
Wild Ride
- Haunted
Mansion
- Pirates of
the Caribbean
- Enchanted
Tales with Belle
Epcot:
- Frozen
Ever After (but the ride got closed)
- Soarin’
Hollywood
Studios:
- Fantasia
- Frozen
Sing-a-long
- Rock ‘N
Roller-coaster
Animal
Kingdom:
- Animal
Safari
 |
| Storm Trooper March @ Hollywood Studios |
Lastly, for
hotel we wanted a suite and didn’t mind paying the extra money for it. The
family suite gave us a one-bedroom suite with two bathrooms and it was perfect.
Packing and What to Wear:
Here’s the
thing. It’s Disney, not a prom – you want to be comfortable. For me, I packed
workout leggings with an side iPhone pocket and cute t-shirts and was comfortable
all week. But everyone needs to decide on their own what is best for them and
also, the time of year. For us during that week in February in hovered around
mid-70s all week so we able to wear leggings and t-shirts and were comfortable
and able to dress to the weather. There are LOTS of “ultimate packing lists”
out there so I am not going to bore you with mine, but I will provide a link
should you want to check it out. Simply click à here
Tips and Advice
- · Buy a good portable charger that can charge your device multiple times. We have this Anker one and it was 100% worth it
- · If you have young kids, be sure to have some type of mobile device that can entertain them while waiting in lines or for food
- · BUY GLOWSTICKS AHEAD OF TIME. We purchased a few packs at the dollar store so then at night when they were selling them, we just whipped out a 3-pack that cost me $1 and she was perfectly excited
- · Bring bubbles. Again, hit the dollar store but it’s totally worth it
- · Crayons and coloring book are an oldie but goodie and never fail for entertainment
- · These caffeine mints are good to keep on you instead of constantly reaching for a cup of coffee
- · Buy the autograph book and large pen ahead of time
- · Pack every type of medicine your family could possibly need. There isn’t a Walgreens on the Disney campus and even if you found meds, they will cost you a ton of money
- · Download the Disney app for on-the-go Fast Pass and dining reservation adjustments
- · In the days before, take screen shots of your reservations so that you don’t have to waste battery or data looking up your reservation
Special
thanks to the amazing woman over at MyDisneyObsession.com – she is available
also on Facebook and quick to answer any questions you may have.
Here is my Pinterest board that should help guide you the rest of the way.
If you have
any questions feel free to comment below, send me an email or send me a message
on Instagram


Subscribe to:
Posts (Atom)