17.7.12

New iPhone Past Time: Appy Couple


I feel like it's been a week of wonderful discovery of technology + weddings. It's sort of funny, that my mom still has the camera she used at my sisters wedding in 1995 that takes film and here we are with apps that let you upload photos you take at someones wedding almost instantly.

Crazy how far we've come?

Anyway - in the latest, most awesome app - Appy Couple is here to be your BFF for your wedding photos, planning and ease of use.


Couples are looking for a way to share their wedding with family, friends and  guests. Until Appy Couple, their only option has been to patch together a  disjointed solution from a fragmented marketplace of: DIY Websites • Mobile and Web Albums • Social Networks • Email Invitations.

Appy Couple for iPad® iPhone® Android ™ and Web is available now by invitation only at:www.appycouple.com.  
It’s free for couples until Fall 2012; the app will always be free for wedding guests.


Appy Couple is the only product that packages everything in one place and 
makes it easy, fun and beautiful to be mobile.

Having played with the app for a while, I must say - it's super easy to maneuver and fun to work with. Wanna check out the site I  made? Click here for it - web site

The days of constantly having to remind guests and even bridal party members of all things wedding are really behind us. Technology sometimes makes things more complicated - but this app seems to simplify it. 

Couples begin by creating their site and app - to make it easier, you can do it via the web. They can set a theme (and tone) for the wedding by selecting from the different backgrounds and themes the app has to offer. 

On the site, a couple can include the story of how they met, engagement photos and special songs. A free coordinating Web site included with each custom app displays the same content as the app, and can be used by guests who don’t have a smartphone, like Great, Great Aunt Joan.
Once the app has been created, the couple can enter their guest list manually or upload it from a spreadsheet, and invite family and friends to access the app for free, using a special code. Each guest will then have access to information, including wedding events, dates, locations, travel accommodations and last-minute changes. There is also a privacy function that allows the bride and bridegroom to select certain guests, like members of the bridal party, to receive private messages.


All of the content - including messages and photos - can be streamed live, for example, for those who cannot attend the wedding. Or for the bride/groom who may want to see how the guests are enjoying their wedding at that actual moment.
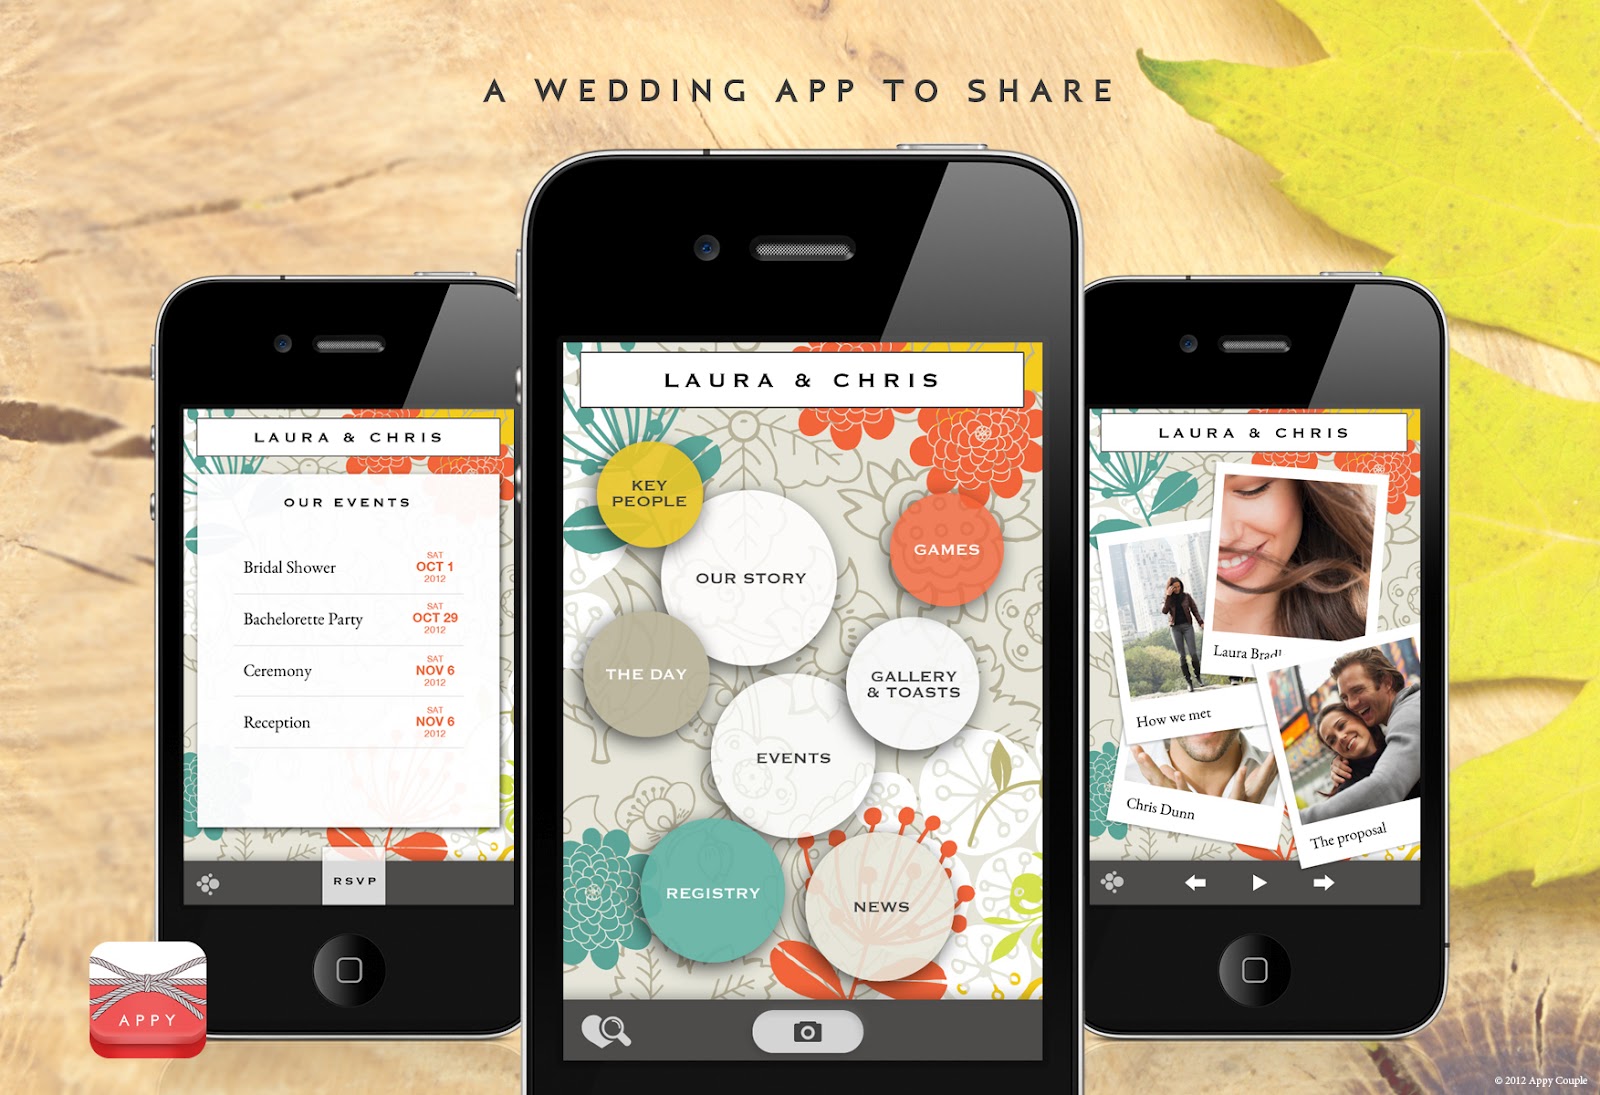
For couples...
•  Guest and RSVP management
• Real-time photo sharing
• Messaging
• Private circles
• Auto-invite guests
• Coordinating free web app and emails
• In-app dashboard

For guests...
• Share photos
• Shop the registry
• Get travel and hotel info
• Interactive event details
• RSVP
• Virtual champagne toasts
• Connect with guests
• Free app download
(from the Appy Couple press kit)


Appy Couple is still in private beta and has already been used by thousands of couples, both nationally and internationally. For now, it’s free, but invitation-only. Appy Couple expects to begin its pay model this fall. There will be a onetime charge for the app and free unlimited app downloads for wedding guests. The app will always be free for wedding guests.


And....here's the best part.

 A handful of readers can now get access to this awesome app. 

Interested?

Leave a comment (with email address) and let me know why you should gain access.

Hurry. This only will last for a week!

- Sara

Update: despite this post being called iPhone past time, this app is available for iPad, Web and Droid (R) 

16.7.12

CDC’s Wedding Day Survival Guide

reposted from the CDC Blog site...


By Caitlin Shockey
putting wedding ring on finger
We’re sure it’s just a fluke that wedding season happens to coincide with hurricane season.  Ensuring that everything is perfect for the big day requires a great deal of strategy, coordination, and patience.  As you gather your nearest and dearest to celebrate what should be a joyful time, Mother Nature, clashing personalities, and unexpected situations could easily thwart even the best laid plans. Being in the throes of wedding season, many of us here at CDC realized that planning for a wedding isn’t that much different from planning for a disaster. Just remember: Get a Kit, Make a Plan, and Be Informed.
Build a Kit.
emergency kitYou’ve put in a lot of work leading up to this event, so the idea of a back-up emergency kit shouldn’t be too far-fetched.  The bridal kit should include extra safety pins, makeup for touchups, maybe a few sedatives. It also wouldn’t hurt to have the essentials from a home emergency kit External Web Site Iconor “go-bag” by your side.  You never know when you might need to bandage up a clumsy flower girl, revive a passed out reception guest, or even evacuate.  A first aid kit, bottles of water, snacks, medications, extra cash, and important documents are just a few of the more practical items to have handy.  If you’re the bride, add this to the list of things you need your maid of honor or someone in the bridal party to put together for you.  For a more extensive emergency kit list, visit FEMA’s Ready.govExternal Web Site Icon
Make a Plan.
Make sure you have a plan for contacting guests in the event of an emergency, and keep a list of emergency telephone numbers on hand.   A little rain on your wedding day is one thing; a severe weather situation is another.  Extra umbrellas for the wedding party are helpful just in case the weather changes on you.
exit signIt may not be a bad idea to have a “runner” to take care of errands and be the go to person for questions.  With out-of-town guests and the whirlwind pace of the big day, a designated point person for emergencies will alleviate panic and frustration if an emergency comes up.  Make sure all of the guests are aware of who they can call if there is an emergency. It’s actually a good idea to have emergency contacts in any situation.
If a tornado warning rips through the area, would you know what to do?  200 guests are not going to be able to crowd into the one windowless bathroom.  Ask the reception venue for their emergency plans and evacuation routes. 
Stay Informed!
Emergencies could range from a tear in your wedding gown, tornado, health issues, monster-in-laws, or bridezilla on the loose.  It’s important to be aware of the possible issues and to do your homework.  Just like you know the risks of putting feuding family members in one room, you should also know to check the weather report. 
You never know when Bridezilla might pop up. When dealing with an emotional bride, try to remember your loved one is probably stressed out and will soon return to her caring self after the wedding is over. Be supportive and have some bottled water from your emergency kit and a box of chocolate on hand.
When you know what to do, you’ll be ready for anything.   Be prepared and have one less thing to worry about on your big day. Weddings tend to bring out the best and worst in people; we hope this wedding survival guide helps keep things manageable.  For more preparedness tips, follow @cdcready External Web Site Icon
7/12/12 updated: All joking aside, stay healthy and be prepared.
http://www.cdc.gov/family/wedding/
http://emergency.cdc.gov/disasters/extremeheat/
http://emergency.cdc.gov/disasters/ 

14.7.12

Extreme Wedding Diet


ABC News reported a new controversial approach some brides are taking to shed weight for the
big day. The diet is known as the K-E diet, and this approach includes inserting a feeding tube
into your nose for up to 10 days for a quick way to lose weight.

The scandalous diet promises up to a 20 pound weight loss in 10 days, and has become a popular
alternative to the old calorie counting days. The feeding tube runs from the participant’s nose
to their stomach and delivers a constant, but slow amount of protein and fat, mixed with water.
Each day the individual will consume a total of 800 calories.

It was reported those on the diet will be “hunger free” and supervised by a doctor. All an
individual on the diet needs to do is carry around a bag of the food solution in their purse and
keep the tube in their nose for 10 days.

Wondering about the cost for this wedding weight loss miracle? According to the Dr. Di Pietro
the cost is $1,500 for the 10 day plan.

With all the pressure to look your best for your wedding it might come as no surprise that brides
are looking to this quick weight loss trick. Many brides fear not being able to fit into their
wedding dress and look for ways to be fit. Do you think this approach is too drastic?


~Alexis


12.7.12

Party Pics!


There are many details that go into a reception. One must consider the venue, flowers, table
arrangements, a seating chart for the guests, and many other stressful aspects. One great way to
make the reception planning process less stressful is by adding a Photobooth to the party.

Photobooths add an amazing element of fun to any wedding party and allow guests to pose with
funny faces and exciting props. Having a Photobooth at your reception is a great way for you and
your guests to walk away from the night with instant print outs of the special occasion.

There are many different companies that have a Photobooth, so you should look at the different
prices before picking one. With each company they offer having the Photobooth at the reception
for 1 hour, 2 hours, or for the entire reception.

Some of the great features include fun props such as crazy hats and glasses, fuzzy boas, and
party masks. These pictures are also great because they offer instant prints for the exact number
of guests in the booth, that way no one has to fight over the pictures.

With social networks taken over these days, the Photobooth is also equipped to upload pictures
instantly to Facebook. Custom logos can be added to the unlimited amount of photos and some
companies provide a CD disc and scrapbook of all the pictures taken.

Tiffany Lopez, of Easton, said “The Photobooth is a fun, care free way of documenting how
much fun everybody would have. I would love to have it at my wedding.”

~Alexis

Miller's Photobooth

Gruvin Photobooth


11.7.12

Style Guide for the Perfect Ring


Buying the engagement ring is the most important detail of any wedding. Without this
key element there is no wedding! For some men the only thing they are sure of is that
they want to take the next step in their relationship and purpose to their girlfriends. But
what ring should you purchase? In order to take some of the guess work out, and so you
do not have to ruin the surprise of the engagement, here are some tips on ring shopping
from a Littman Jewelers Sales Representative.

The most popular style this wedding season is the Halo style engagement ring. This
style has two different types of cuts: princess and round. The Halo is one large diamond
surrounded by a cluster of smaller diamonds. If you are not up to the price of this stylish
ring, there is an alternate with a similar look known as the Quad style. This ring has four
stones in the middle rather than the one big diamond, and is still surrounded by smaller
diamonds. This offers a big appearance but with a smaller price.

Band styles are just as important as the actual rock itself. Popular colors for engagement
rings are white gold, which as Jamie Curto a Littman’s Sales Representative put it, will
be stronger and cheaper than platinum.

Curto also noted that the typical man will spend 3 months pay on an engagement ring.

The best advice to give is to come into the jewelry store with an idea in mind. Know what
your price limit will be and the style of your soon to be bride. Knowing this will enable
an easy shopping experience.

~Alexis


5.7.12

Wedding Party iPhone App

Everyone takes tons of photos at your wedding - and the truth is, it's difficult as hell to collect them all and save them for you to look at.

And while there are a number of other options, this one seems like the best (well of course for those people with iPhones) by far.

Wedding Party is the app for the wedding! Couples can customize the app to make it their own and their guests can download the app to contribute their memories of the big day.


the Wedding Party iPhone App allows you to see your guests photos without really trying that hard.


For Guests:
*Use Wedding Party to contribute to the couple’s big day!
*Share the photos you take on your iPhone into a timeline where all of the pictures from all of the guests are collected
*Meet other guests, help create a guestbook and interact at the wedding in an engaging new way

For the Couple:
*Create a custom wedding experience for your guests with Wedding Party
*Wedding Party collects all of the photos taken on your guests’ iPhones to create a beautiful timeline of the event
*Collect candid shots that your photographer will miss and experience your wedding through the eyes of your guests!
*Guests who can’t make it can follow the progress in real time

Get started in Four Easy Steps 


(1) Set up iPhone app
     Enter your name, wedding details, and choose a wedding name

(2) Upload a Photo
     Choose and upload a cover photo for the iPhone app

(3) Invite Your Friends
     Email your family and friends and invite them to download the app and register with your wedding name

(4) Shoot & Share
     Enjoy all the photos that your family and friends take, and share them on your MyWedding Free Wedding Web site


4.7.12

Happy 4th of July!

Happy 4th of July to all the beautiful couples out there.


But most importantly happy 4th to all our soldiers and their families serving in our military!


2.7.12

DIY Wedding Day Hair Trends from Nicholas Penna, Jr. of SalonCapri


Say “I Do” To DIY Bridal Hairstyles from Nicholas Penna, Jr. of SalonCapri

Great Gatsby Pin-up
  

1.       Prep damp hair with a smoothing cream or serum, like Shu Uemura’s White Tea Polishing Milk.
2.       Blow-dry hair with a large, round, boar bristle brush for a smooth and voluminous finish.
3.       After blow-drying, create a deep side part to one side of the head, about 3-4 inches from the natural part.
4.       On the fuller side of hair, collect a 3-4 inch section that goes from the forehead to the middle-top of the head and separate it. This section will be used at the end of the steps and should be the thin, top layer of the hair.
5.       Pull the rest of the hair into a tight pony-tail at the nape of the neck, using a comb or brush to smoothly fasten your locks. 
6.       Slowly twist hair around the elastic; starting in the middle and moving from the right to left side, making a full-twisted bun.
7.       Tuck the end strands underneath the bun and use bobby-pins to gather in all 4 sides.
8.       For a looser look, Nick suggests using the pointed end of a comb to push into the up-do, and pull the hair outwards. This will loosen up the hairs and give the bun a relaxed hold.  
9.       Once the bun is complete, take the separate strand (from step 2) and straighten it with an iron so that when it is curled, it will have a clean, crisp appearance. 
10.   After straightening, coat the section with a pea-sized dollop of gel for better hold and enhanced shine.  Nick recommends using L’Oreal Professionel’s Golden Modeling Gel. 
11.   The easiest way to make the wave is to use a hot tool deep waver on the strand of hair. However, to avoid extra expenses, Nick believes a straightener or hair curler will do the trick just as well. 
12.   Simply wrap the hair loosely around a thick-sized curler (or straightener) for a few seconds.
13.   Once the curl is made, tug it out so it unwinds into a wave.
14.   Pull the wavy strand over the ear and pin it underneath the bun to hide the ends.
15.   To finish up, use hair spray to hold everything together. Nick’s favorite spray is L’Oreal Professionel’s Infinium 3 Strong Hold Working Spray, which keeps hair in place for this classic 1920’s look.   


The Head Band Beehive
 

1.       Prep hair with a texture-enhancing spray. Nick’s go-to is Shu Uemura’s Fiber Lift.
2.       Blow-dry hair with a large, round, boar bristle brush for a voluminous finish.
3.       Separate hair into two sections:  half up and half down.
4.       Start with the bottom section and brush the hair over to the lower left side of the head and pin in place.
5.       Once secured, fold the same section back over top of its pinned pieces and tuck it underneath itself (so it forms a ‘French twist’ like structure) at the middle-back of the head.
6.       Pin all pieces in place—this will create an elongated, French twist-like structure.
7.       From the top section, sweep small strands from the sides of your face into the twist using a comb. To prevent these pieces from falling out, Nick suggests combing the hairs with Shu Uemura’s Shape Paste.
8.       Now take the remaining top section of hair and prep with hair spray.
9.       Begin backcombing each section by repeatedly brushing or combing the hair towards the roots. Nick recommends using a fine tooth comb during this process to create the most volume out of the tangled hair.
10.   When all top strands are completely backcombed, gather the hair as if to make a pony tail above the twist and create the desired shape and fullness of the beehive. Use the back end of the comb to help shape the structure.
11.   Tuck and pin the ends under the side of the chignon.
12.   Lastly, Nick likes using Shu Uemura Sheer Lacquer Finishing Spray to tidy up any loose hairs
13.   Place a simple white headband to bring together this stylish bridal look.

  
Elegant curls
  
1.       Blow-dry hair with a large, round, boar bristle brush for a voluminous finish.
2.       If you have naturally curly hair, Nick suggests straightening your hair to guarantee that the new curls are clean with no frizz. Before straightening, Nick recommends using Shu Uemura’s Protective Thermal Spray to prevent heat damage.
3.       Part hair on the preferred side of the head.
4.       Starting in the back, select a 1-2 inch portion of hair.
5.       Using the straightener, clamp down onto the hair near the roots of the head.
6.       Wrap hair around the iron once, and then flip the iron over, rotating it 180 degrees.
7.       Pull straightener down full piece of hair and release. This will leave soft, natural looking curls. Nick notes that by pressing lightly with the clamp (just enough to loosely hold the hair), curls will look weightless and voluminous.
8.       Curl the pieces from the back to the front. Nick instructs to flip the straightener the same way each time so the curls go the same direction.
9.       To create the small puff in the front, tease the strands right behind the first layer of hair located above the forehead. 
10.   Pull the first layer of hair over top of the teased pieces, and comb together.
11.   Curl the final front strand to complete the look.
12.   To ensure that the curls hold throughout the day, Nick suggests lightly spraying the hair with a medium hold hairspray. He loves Shu Uemura’s Sheer Lacquer.